
Connect Your Website Forms to ABC Sales AI
Website Forms sends enquiries from a form on your website into your ABC Sales AI account as leads. Use it for contact forms, quotation requests, event registrations, waitlists or job applications. Your website keeps its own design.
The journey is: a visitor submits your website form → ABC saves the lead → your configured follow-up can begin.
Who Does What?
- You, the account owner: choose the ABC account, where each answer is saved, which websites may submit, and how your team should follow up.
- Your website developer or coding assistant: connect the form on your website to ABC using the form key, then test it. Your website builder must support a custom submission or an integration that can send it.
You may also see this called a Public Form in technical instructions. It is the submission connection your website uses, managed under Settings > Website Forms.
Before You Start
Prepare your website address, the exact field names your website sends, and any automation you want to run. Ask your developer for the field names if you are unsure; Step 3 explains them.
Create any custom fields you need in ABC before matching them. Use the account that should receive these leads. If different languages belong to different accounts, create and connect each form in its intended account.
Step 1: Create a Website Form Connection
- Go to Settings.
- Open the Website Forms tab.
- Click New form.
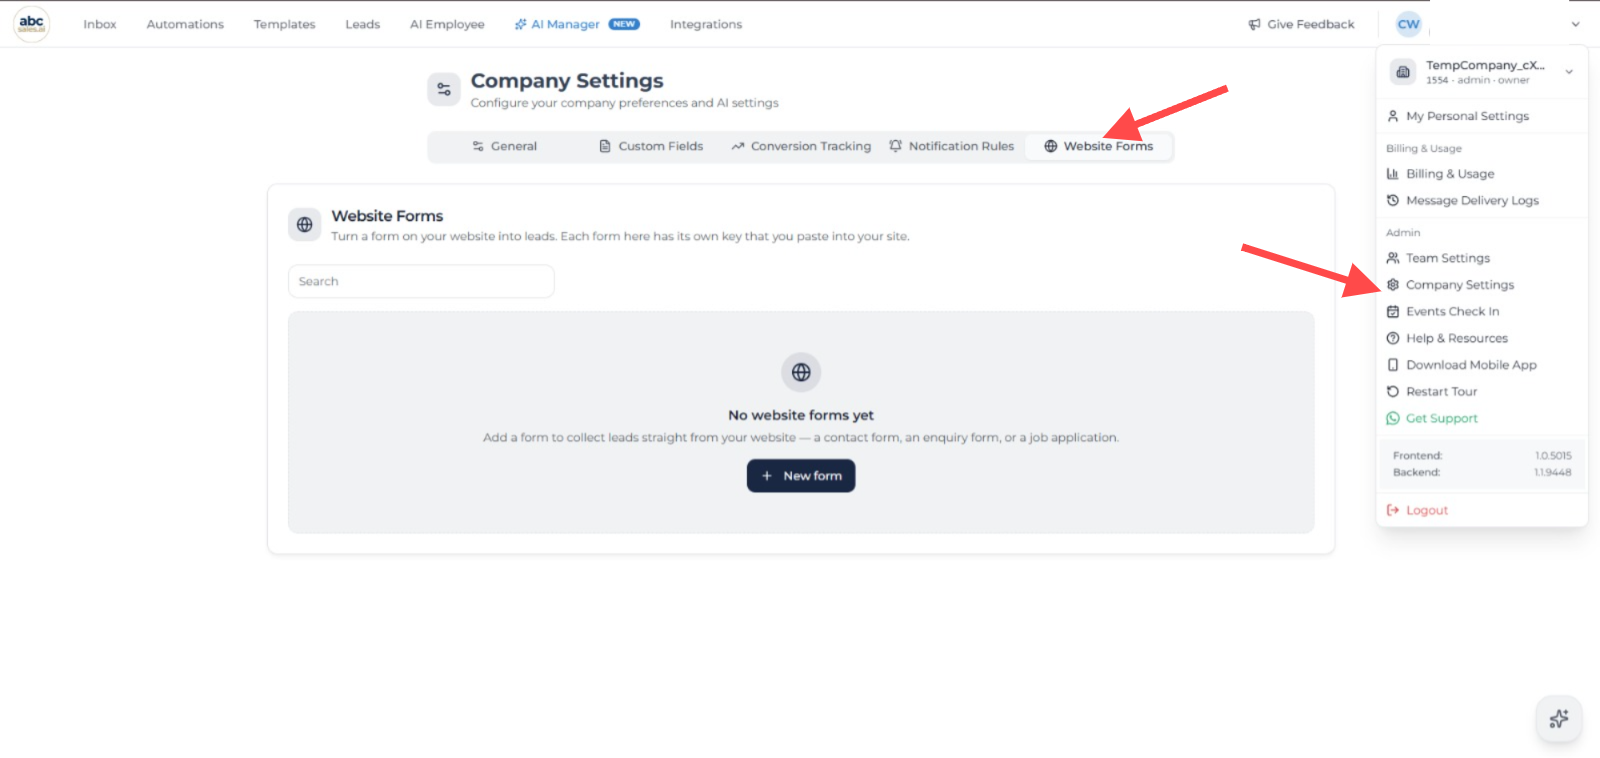
Company Settings Website Forms tab with Company Settings, Website Forms, and New form highlighted
- Enter a Lead Source, such as
Contact Form,Event Registration, orCareers Form. - Choose an Automation to Run, or select None.
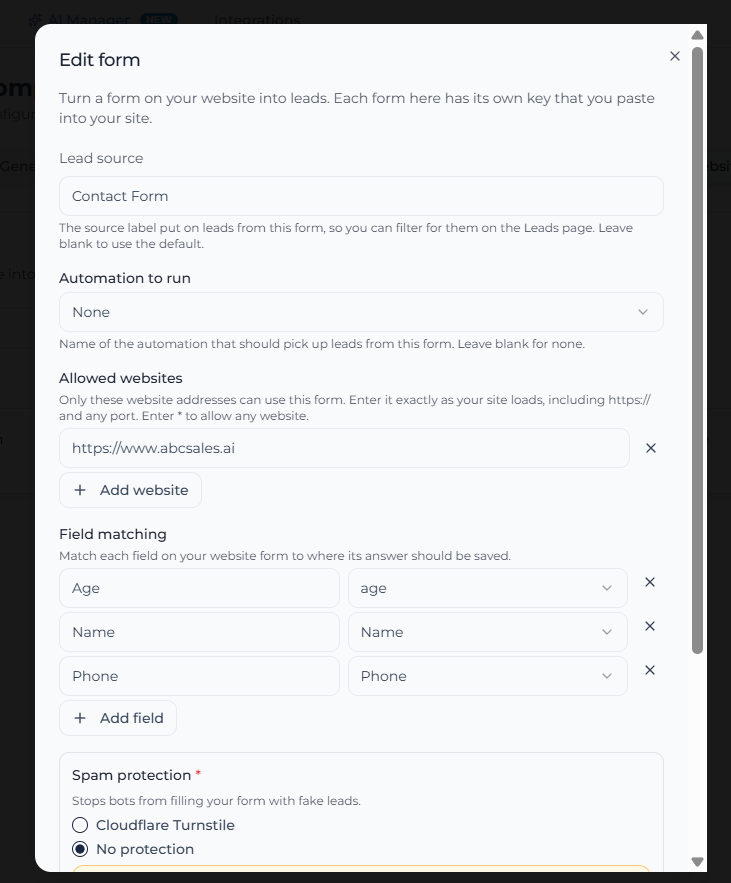
Website form setup dialog showing lead source, automation, allowed websites, field matching, and spam protection
The Lead Source helps your team identify where the enquiry came from. If you select an automation, only that automation is started for leads from this form.
Step 2: Add the Allowed Website
Under Allowed Websites, enter the website address that is allowed to use this form connection.
Use the website origin only, for example https://example.com. Do not include a page path such as /contact.
Add each version your form actually uses. For example, https://example.com and https://www.example.com are treated as different websites.
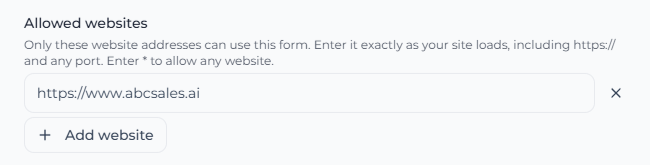
Allowed websites section showing the website origin and Add website button
Step 3: Match Your Form Fields
Field matching tells ABC where to save each answer. The left-hand Your form field box needs the exact name sent by your website, not the visible label or an example answer.
For example, a visitor sees “Your name” and types “Alex Tan”. If the website sends that answer as name, enter name on the left and select Name on the right.
For a website that sends name, email and phone, use:
name→ Nameemail→ E-mail addressphone→ Phone
These examples only work if your website sends those exact names. If it sends full_name, use full_name instead. Ask your developer or coding assistant: “What field names does this form send to ABC?” Match each website field and destination only once.
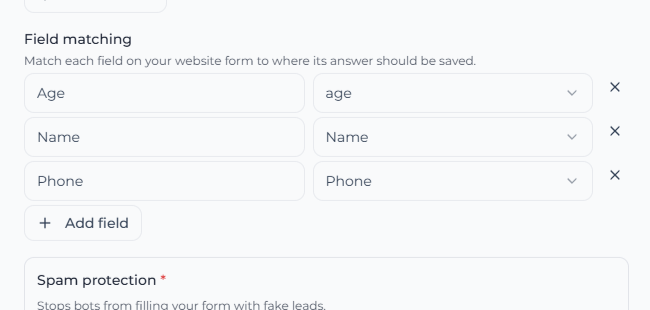
Field matching section showing website fields matched to ABC Sales AI lead fields
Step 4: Choose Spam Protection
Cloudflare Turnstile helps prevent bots from submitting fake enquiries. A small check on your website gives ABC a verification token to check before accepting the submission. You do not need to move your website hosting or DNS to Cloudflare to use it. How Turnstile works.
- Cloudflare Turnstile: use this for spam protection. It is required when you select Automation to run.
- No protection: available when no automation is selected. It skips this bot check and can allow unwanted submissions.
Get Your Cloudflare Keys
- Sign in to Cloudflare, open Turnstile, and choose Add widget.
- Name the widget, for example “Website enquiry form”.
- Add your website's hostname, for example
www.example.com. This Cloudflare field uses the hostname; ABC's Allowed websites field uses the full origin, such ashttps://www.example.com. - Choose Managed mode and create the widget.
- Copy its Site key and Secret key into the matching fields in ABC.
Follow Cloudflare's widget setup guide for the current screens. Your developer must also add the Turnstile widget to the website; saving the keys in ABC alone does not complete that setup.
Three Keys, Three Different Jobs
- ABC Form Key — begins with
pfk_: identifies the ABC form connection receiving the answers. Copy it from ABC after saving. Give it to your developer to put in the website's submission code. It is designed for public website use and does not grant account access. - Cloudflare Site key — public: identifies the spam-protection widget. Put it in ABC's Site key field and give it to your developer for the website widget.
- Cloudflare Secret key — private: lets ABC verify the visitor's Turnstile token. Put it in ABC's Secret key field. Never put it in public website code or a shared AI prompt.
The ABC form key is not a Cloudflare key. Do not paste it into either Cloudflare field.
Step 5: Choose What Happens After Submission
Use the two switches to control new leads from this form:
- Handled by AI: allows the AI Employee to handle the lead.
- Scheduled Messages: allows scheduled messages for the lead.
These are separate permissions. Turning them on does not, by itself, send a welcome message. Outgoing messages still depend on your automation, messaging-channel setup and the lead's usable contact details.
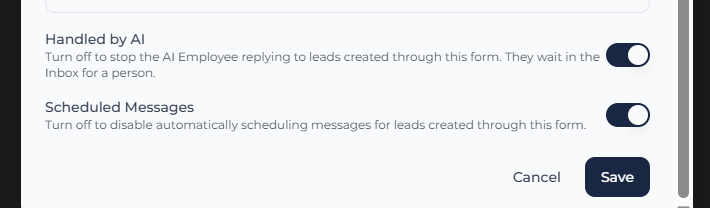
Website form settings showing Handled by AI, Scheduled Messages, and Save
Step 6: Save, Then Connect Your Website
- Click Save.
- Find the new form in the Website Forms list and copy its Form Key.
- Give your website developer or coding assistant the handoff below, with your own details filled in.
Do not put the form key into a visitor-facing form field. It belongs in the website's submission configuration. The account owner sets up the ABC connection; the developer connects the website to it.
Copy This Handoff
Replace each placeholder before sending. Include only the public form key and, if needed, the public Turnstile site key. Enter the private secret directly in ABC.
Technical Details for the Developer
- Send JSON to
POST https://api.abcsalesbot.com/public/forms/submitfor the live ABC environment. For staging, use the matching staging API; a staging form key belongs to staging. - Put the ABC form key in the
X-Form-Keyheader and the answers insidefields, using the exact names from Field matching. - When Turnstile is enabled, render its widget using the public site key and send the resulting token as
captcha_token. Keep the secret key in ABC. - Submit from an origin listed in Allowed websites. Handle failure and expired verification tokens; show success or redirect only after a successful API response.
Step 7: Test Before Going Live
- Open the connected form on your website, using a private or incognito browser window.
- Submit a test entry with contact details you control and can distinguish from real enquiries.
- Open Leads or the Inbox in the intended ABC account.
- Check the name, email, phone, lead source and any custom answers.
- Check that the website shows success or opens the right thank-you page only after ABC accepts the entry.
- If you selected an automation, check its enrolment and follow-up with your channel setup. Confirm the AI and scheduled-message permissions match your choices.
If something fails, use the troubleshooting questions below. Do not treat a thank-you page alone as proof that ABC saved the lead.
How Repeat Submissions Work
ABC looks for an existing lead in your account with the same phone number and lead source. Phone numbers are normalized before matching. If a match exists, ABC updates that lead; otherwise, it creates a new one.
Use a different lead source for each form if you want to keep their leads separate. Changing a form's lead source may create a new lead when the same person submits again.
Managing a Website Form
From Settings > Website Forms, an Owner or Admin can:
- Copy the form key
- Edit field matches, allowed websites, spam protection, AI settings, and the selected automation
- Turn the form connection on or off
- Delete the form connection
Other company users can view the Website Forms list but cannot change it. If a form key is misused, deactivate the connection or delete it and create a new one.