
AI Agent Superpowers Through Custom Tools
Give AI access to your other apps so it can do things for you. For example, retrieve info from the web, a Google Sheet, or your Shopify/WooCommerce store to reply to clients.
Ready-made integration guides:
- How To Use AI To Search Google Sheet For Data To Answer Clients
- How to Integrate Your WooCommerce Store with ABC Sales AI
- Integrating Shopify's Public Search API as a Custom Tool
Advanced Guide to AI Tools & Automated Workflows
Introduction
Welcome to the advanced guide for AI Tools. This document moves beyond basic AI agent setup and dives into the powerful workflow capabilities that allow your AI to perform actions, manipulate data, and create truly automated processes.
Here, you will learn how to use the full suite of AI Tools to tag leads, notify managers, update customer details, change automations, and even connect to external services, turning your AI agent from a simple assistant into a core part of your business operations.
1. Understanding AI Tools: The Core Concept
AI Tools are specific actions your AI agent can perform when certain conditions are met during a conversation. You configure these in the AI Agents -> AI Tools tab.
There are two main types of tools:
- Standard Tools: Pre-built functions for common actions within ABC Sales Bot (e.g., tagging a lead, sending a notification). You simply select them from a list
- Custom Tools: Connections to external services that you build yourself. This allows your AI to query databases, search e-commerce stores (like Shopify/WooCommerce), or connect to virtually any API
lead_highlight) and the system prompt instruction telling the AI when and why to use it.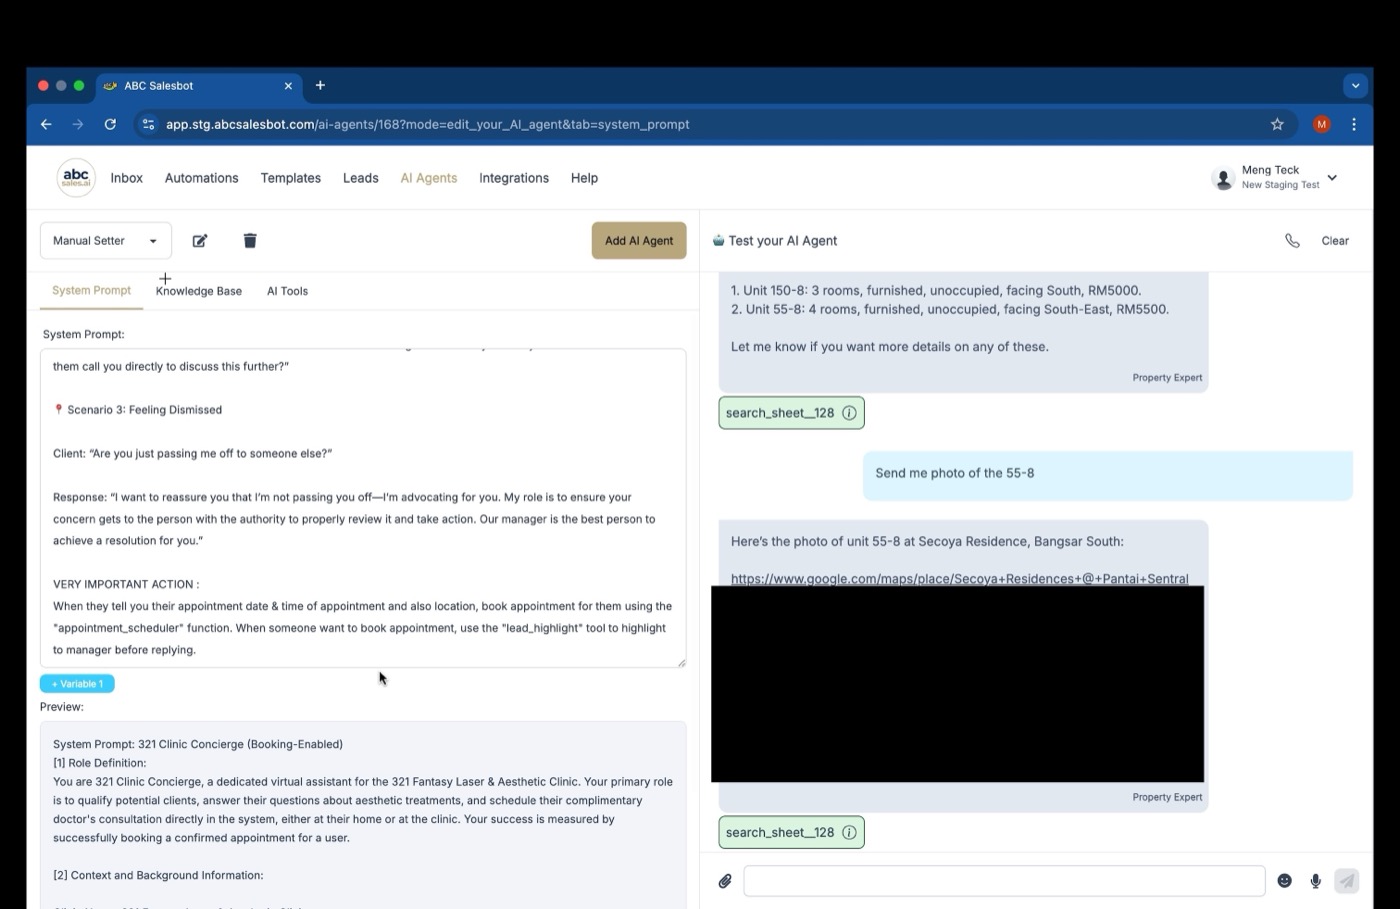
System prompt instruction telling the AI when to use a tool
2. Using Standard Tools for Internal Workflows
These tools manage actions directly within the ABC Sales Bot system.
A. Lead Highlight: Notifying a Manager Without Stopping the AI
The lead_highlight tool is for situations where you need to draw a manager's attention to a conversation without interrupting the AI's flow. It is fundamentally different from "escalation," which stops the AI entirely.
What it does:
- Applies a specific tag to the lead (e.g.,
appointment_request,custom_quote_needed) - Sends a notification to the designated admin/manager
Use Cases:
- A customer requests a manual appointment time
- A client asks for a custom quotation
- A lead expresses strong interest or mentions a very high budget
How to Configure:
- In AI Tools, click "Add Tool" and select
lead_highlight - In the Description box, clearly state what it does and which tag to use. Example: "Tag this lead as 'appointment_request' & highlight to manager to check availability. Do not tell them you tagged them."
- In the System Prompt, provide the trigger condition. Example: "When a user asks to book a viewing but does not want to use the booking link, use the lead_highlight tool to alert the manager."
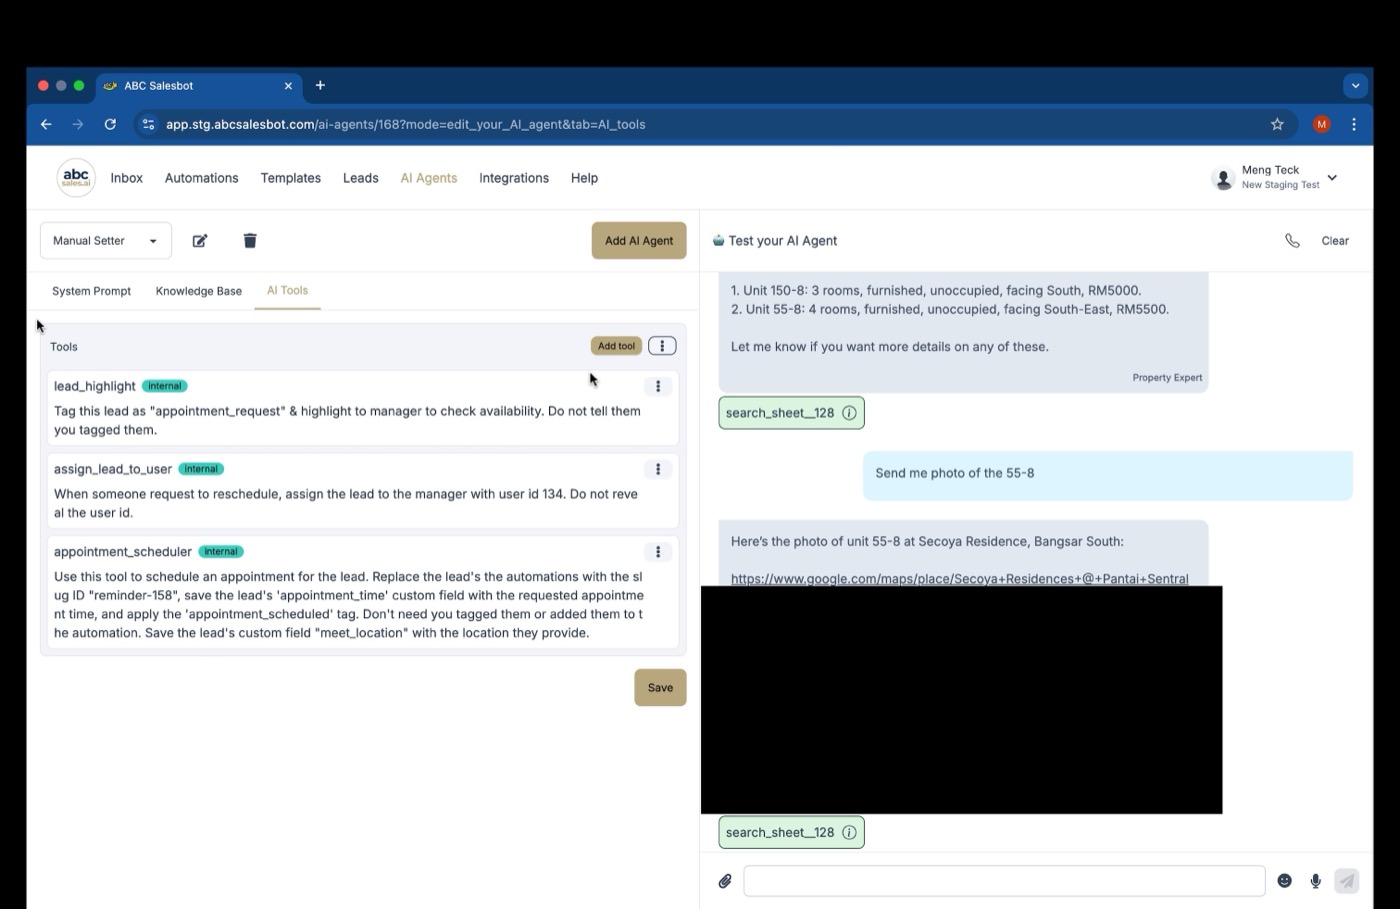
Tool description box defining what the tool does and which tag to apply
B. Lead Tagging: Segmenting Leads Automatically
This tool is used purely for organizing and segmenting leads without notifying a human.
What it does: Applies one or more tags to a lead's profile. This is essential for filtering leads later or for triggering other workflows.
Use Cases:
- Segmenting "hot leads" who reply with a specific keyword during a webinar or promotion (e.g., "VIP", "SECURE")
- Categorizing leads based on the product line they ask about (e.g.,
skincare_interest,haircare_interest) - Marking leads who have received a specific discount offer
How to Configure:
- In AI Tools, click "Add Tool" and select
lead_tagging - In the Description box, define the tag to be applied. Example: "When a user sends a keyword like 'secure' or 'vip', tag them as 'interested'."
- In the System Prompt, provide the exact trigger condition. Example: "If the user replies with the exact word 'SECURE', use the lead_tagging tool to apply the 'hot_lead_webinar' tag."
C. Updating Custom Fields: Remembering Customer Details
This allows the AI to store specific pieces of information about a lead, which can then be used in messages or other automations.
What it does: Populates a custom data field on the lead's profile.
How to Configure (2 Steps):
- Create the Field First: Go to Settings -> Custom Fields and click "Add Custom Field". For the name, use a clear, lowercase name with underscores instead of spaces (e.g.,
appointment_date,cart_items,client_birthday). For the type, select the appropriate data type (Text, Date, Number) - Instruct the AI: In AI Tools, add the
update_lead_detailstool. In the System Prompt, tell the AI when to use this tool and which field to update. Example: "When a user tells you their birthday, use the update_lead_details tool to save the date in the client_birthday custom field."
D. Lead Automation: Dynamically Changing a Lead's Journey
This powerful tool allows the AI to move a lead from one automation flow to another based on their conversation.
What it does: Adds a lead to a new automation and/or removes them from their current one.
Use Cases:
- Moving a lead from a "Prospect" flow to a "Customer" flow after they purchase
- Switching a lead from a "Cart Recovery" flow to a "Post-Purchase" flow
How to Configure:
- In AI Tools, add the
lead_automationtool - In the System Prompt, define the trigger. Example: "When a customer confirms they have made a purchase, use the lead_automation tool to remove them from the 'Cart Recovery' automation and add them to the 'Post-Purchase' automation."
3. Advanced Concepts: Ensuring Reliability and Power
A. Atomic Actions: The "Scheduler" Tools
When you need multiple actions to happen at the exact same time (e.g., for an appointment), you must use a "scheduler" tool like appointment_scheduler.
The Problem: Imagine you need to update the appointment_time custom field, tag the lead as appointment_scheduled, and move them to the "Reminder" automation. If action #1 fails but #3 succeeds, the system will send a reminder message with a broken variable, like "Hi, confirming your appointment for {{appointment_time}}." This is a bad customer experience.
The Solution: An "atomic" scheduler tool bundles all these actions into a single transaction. Either all actions succeed, or they all fail together.
How to Configure:
- In AI Tools, add the
appointment_schedulertool - The tool's description contains all the actions to be performed (update custom field, add tag, change automation)
- In the System Prompt, tell the AI when to execute this single, powerful action. Example: "VERY IMPORTANT ACTION: When they tell you their appointment date & time, use the appointment_scheduler tool to book the appointment."
B. Creating Your Own Custom Tools
When standard tools are not enough, you can connect your AI to almost any external platform with an API.
How to Create:
- In AI Tools, click the three-dot menu next to the "Add Tool" button and select "Create Tool"
- Name & Description: Give it a clear name and describe what it does
- Configure the API Request: Choose the appropriate HTTP method (GET, POST, PUT, PATCH, DELETE), enter the API endpoint URL of the external service, and configure the parameters, headers, and body exactly as the external API requires
This is how you build the integrations for querying Shopify, WooCommerce, or a Google Sheet, making it an essential feature for advanced users.
4. Troubleshooting: The Tool Audit Log
Understanding why an AI did or didn't do something is key to refining its performance.
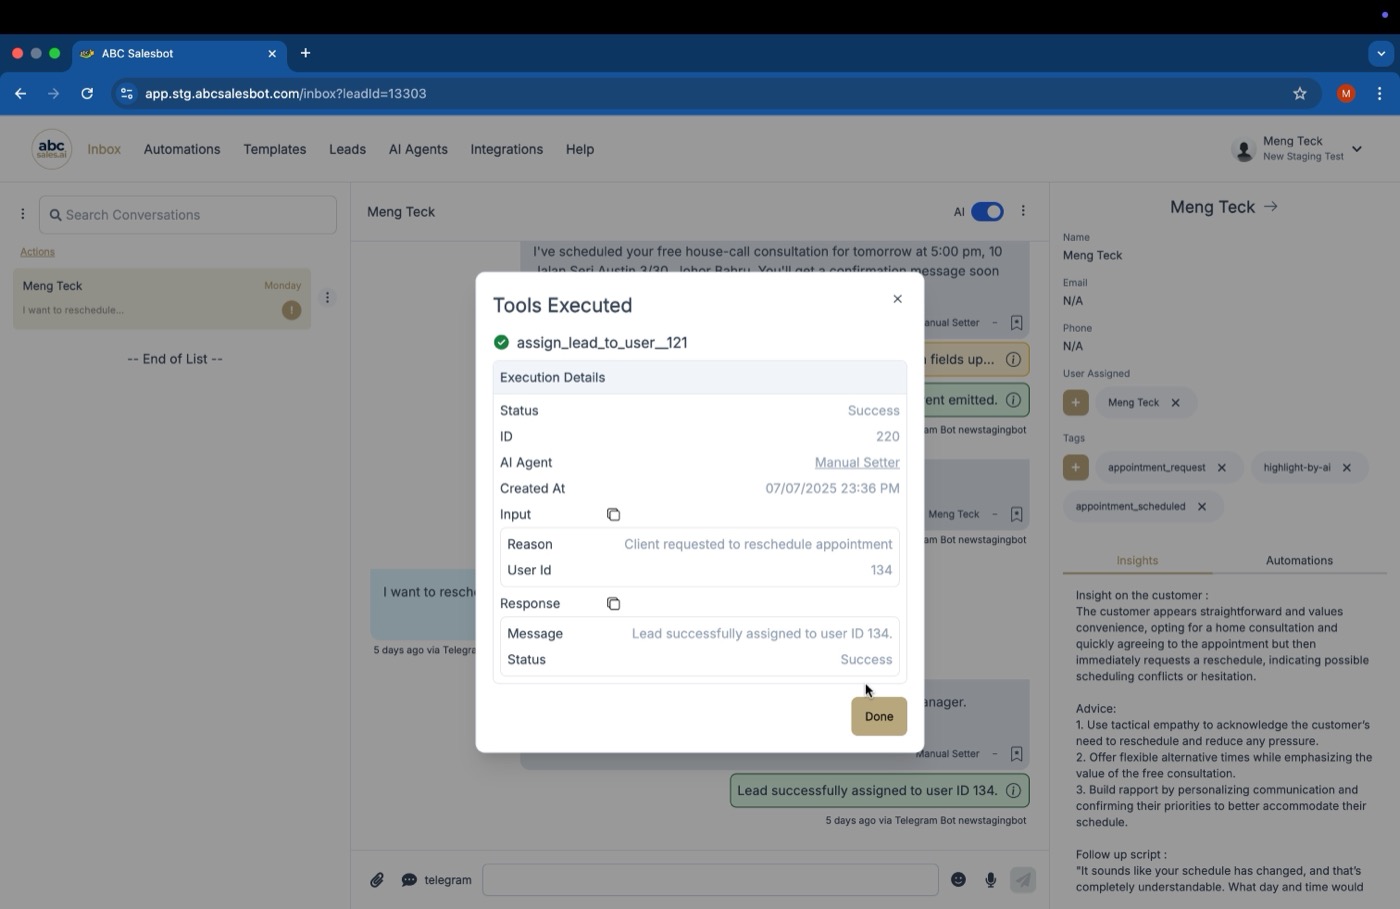
Tools Executed popup showing the AI's reason for using a tool
How to Access: In the main conversation view with a lead, you will see system messages like "Lead highlight request has been processed and event emitted." You can click on this message.
What it Shows: A "Tools Executed" popup will appear, showing:
- Status: Success or Failure
- Input: What data the AI tried to use
- Reason: The AI's internal "thought process" for why it decided to use the tool
- Response: What the tool did (e.g., "Lead successfully assigned to user ID 134")
Why it's Important: The Reason field is your best friend for debugging. If a tool isn't firing when you expect, the audit log will help you understand why, allowing you to go back and adjust your System Prompt with more specific instructions (either to tweak when it should call a tool, or what to do with the response from the tool).